
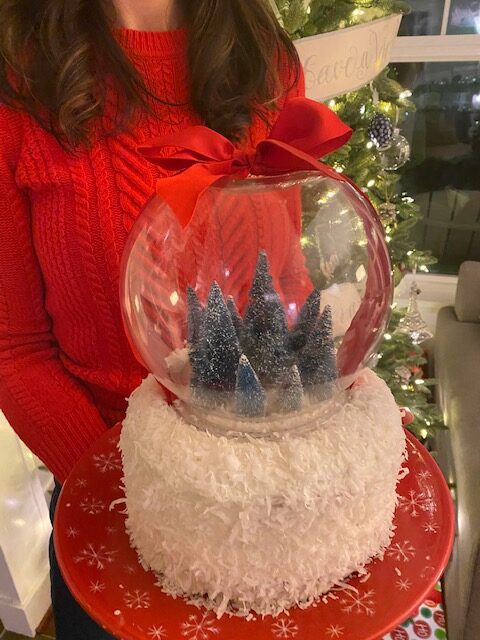
Celebrate the Holidays with a Snow Globe Cake
Do you have a friend or loved one with a December birthday that you would like to celebrate in a special way? Or perhaps you are looking for a fun holiday baking activity with your kids? We have a recommendation for you: make a snow globe cake! This baking project is a simple and fun with a definite WOW factor. Kids can help make the cake layers, spreading the frosting (if you are brave!), putting on the coconut snowflakes, and designing your snow globe scene. And we had time to make this cake because we, unlike our mother, buy our children’s’ gingerbread houses prebuilt instead of tracing, cutting out by hand and baking hundreds of gingerbread logs 🙂

Snow Globe Cake Supplies
- 1-gallon plastic fish bowl (available here)
- 3-16 oz. cans of frosting (choose vanilla or cream cheese)
- 2 boxes of cake mix (Choose your own cake favorite flavor! Can even be funfetti, we won’t tell. You will also need the ingredients noted on your box of cake mix to make the cake layers, probably oil and eggs.)
- 2 – 8 inch cake pans
- 1 – 14 oz package of sweetened flaked coconut
- 1.5-inch wire-edged ribbon (I buy my ribbon at Costco every year and am partial to red
- Small holiday figurines to create your snow globe scene (we used mini bottlebrush trees, similar here), but reindeer or nutcrackers would also be fun!
- 4 inch wide strips of parchment paper cut approximately 5 inches in length.
- Clear gift wrap tape
Instructions
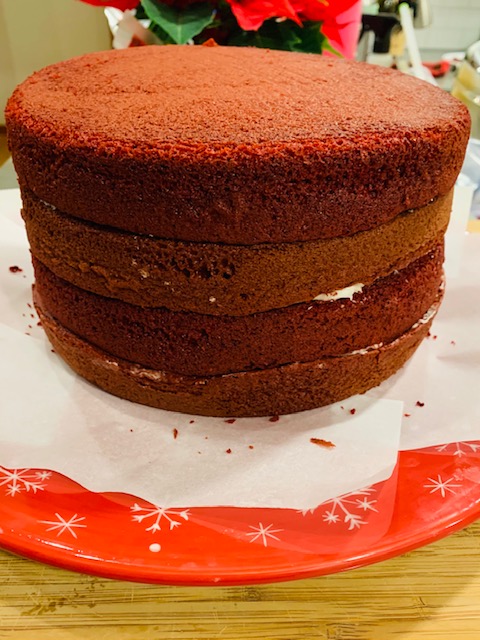
- Make four 8-inch cake layers according to the instructions on the cake boxes (two layers per box).
- Allow each cake layer to cool completely before beginning to assemble the cake.
- Using a serrated knife to prevent tearing, trim off the dome of each cake layer to make flat. Mom tip: kids and partners love to eat the cake scraps!
- Place the first cake layer (trimmed side down) on your cake plate. Wipe away all crumbs.
- Tuck in strips of parchment paper slightly under the edges of this first cake round. Once your cake is complete, you can remove this strips and your cake platter will be clean and frosting free.
- Spoon approximately 1/2 can of frosting on the top of this layer and, spread the frosting evenly, in short strokes while working your way to the edges. I like to use a butter knife, but an offset spatula will also work great.
- Top the first layer with the second layer (again, top side down to create the most even layer). Spread another 1/2 can of frosting on this second layer. Repeat until you have a four-layer cake.

- Repeat frosting the top cake layer, letting extra frosting accumulate at the edge of the cake. Using the flat edge of your knife or spatula, push the extra frosting over the sides of the cake. Turn the cake stand with your hand as you frost the sides of the cake.
- Once cake is entirely frosting, using your hands gently pat and press the shredded coconut all over the cake until entirely covered.

- Once your cake is both frosted and covered in coconut, gently invert the fish bowl, onto the center of the top cake layer to create a slight indent. Then remove fish bowl. This indent is the area you have to create your snow globe scene. Gently press your holiday figurines into the area created by the indent. Be creative!
- Then take your wire-edged ribbon and gently wrap around the fishbowl to determine how long your ribbon needs to be. Remember to leave enough length to tie a bow on top. Cut the ribbon to your desired length. Then cut your length of ribbon in exactly half.
- Using your clear gift wrap tape, take each ribbon half and tape it approximately one-half inch under the lip the fish bowl so that the tape and ribbon end are inside the bowl. Don’t worry….this will be hidden by frosting and coconut. Repeat on other side of fish bowl.
- Once both ribbon ends are secured, invert the fishbowl and tie a bow on top. Then trim ribbon ends to desired length.
- Once ribbon is tied, gently place the inverted fishbowl back on top of your cake pressing slightly into the cake to secure.
Questions during the snow globe cake baking process? Send us a DM at @letswineaboutitsister. We promise to answer promptly! And if you do make a snow globe cake, please take a picture and tag us. We would love to see your snow globe masterpieces.
And, have you seen this fun new way to serve cake? Everything is better in a wine glass! Cheers!


One Comment
Hillary
Thanks for the great celebration and wonderful cake. It was a great kick off to 34 to have my boobs and hands featured on the blog!!!